
Please visit my more recent anime digital art tutorial here 'Falling Apart' -Digital anime art tutorial.
*Most/all the parts I made on all separate layers.
*All this is from what I know to do easiest, I am not the best and there will probably be much better ways of doing this, mine just comes as an example for techniques.
*I am only using Photoshop CS2, things may varies of different versions.*More in depth examplainations on all the images, so please click to enlarge them. :).
*All images are above the examplanation of that section.
*This painting can be found on my deviantART page ->http://mayonakasun.deviantart.com/art/Pirate-Girl-126031671
I hope you enjoy :).
So first thing, is scan in your image.

I then turn down the 'opacity' by selecting my image in the 'layers menu', and changing the 'opacity'. In my case, I changed it to 66%.
This allowed me to be able to make a new layer, and start my lining.
I always make a new layer and fill it with white, so I can see the image/lineart without the original under it, so I can see any parts that are missing and any parts I made a mistake on.
(Make a new layer pressing 'Shift+Ctrl+N' or by going to the 'layers menu' and clicking 'new layer' icon and filling it white with the 'fill tool'.)
Right so back onto the line art.
 I always put the setting of my tablet or brush tool to the follow settings(see image). !!
For me what I find easiest, is the lining in sections for example the anime eyes, hair, clothes, this is optional as you can do it the way you find best.
Use the graphics tablet as if you were using a pen or pencil, but don't press as hard. Again this is a personal preference you may have your own way of using your own tablet.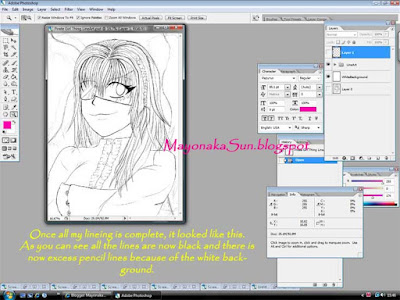
So once I've completed all the lining, it looked like this (see image)

So once I've completed all the lining, it looked like this (see image)
 Now we can start the colouring.
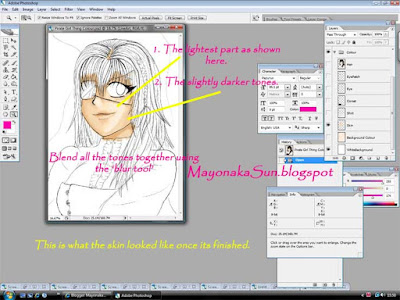
So first I always start off with the skin. I always being with the very lightest tones first (see image) and then build onto, gradually getting darker.

Then its the hair. First thing I do is the first base coat/layer of hair, by doing a single colour fill.
I normally just colour it, using a big brush normally 34px to 40px.
Then I make new layer and start to build onto the hair, creating a more textured look with thin strokes from the brush tool usually using 10px to 6px. (As seen in the example) These sizes only go towards whatever size your particular drawing is mine as an example was 2496px by 3508px= A4 size.
I go over that process as much as possible, so I can make it look quite natural but stick to the whole anime theme and style.
I then merge those 2 layers together, by going to the selecting both of those layers, 'right-clicking' and clicking 'merge layers'

The next part I colour is the anime eyes and eye patch (each on separate layers).
I try to make the eye the main focus. So first thing, comes the lightest base colour for my case being the purple/lilac.
Then its time to start filling the detail.

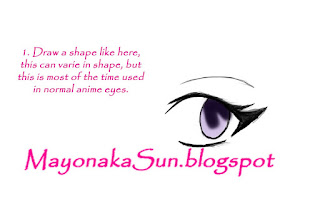 I do this by making a crescent shape at the very top of the first colours next to the top eyelashes using the same colours but darker (see example). This continues on to swooping down to create a pupil effect using the same darker purple. Next is to create the high lights and shine.
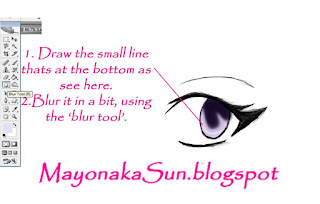
First using the 'eyedropper tool' take the first lightest colour you used on the eye and lighten it by 'double-clicking' on the colour sample on the side, and lightening it to the desired colour. After change the size of your 'brush tool' to about 8px (or a size to suits your preference) and draw a half circle at the bottom of your eye. (See example), then blur it in a bit by using the 'blur tool'.
 Next is more highlight and shine. Using white, draw small circles, as shown in the example again blend it in and go over if necessary, then your eyes or eye should be complete. Obviously use the same process for both eye :).
 Once the eyes are complete, I colour the clothing, this process I think takes the shortest time, but comes into how much detail you have on your own. 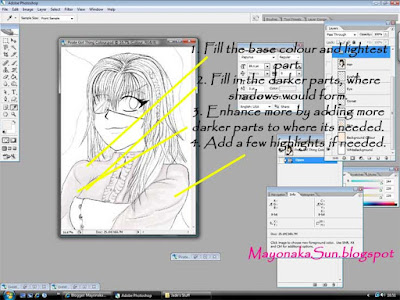

I first coloured the blouse/shirt. I never keep whites white, 'cause if I did leave it white I would not be able to blend colours, so again I used roughly a 40px to 50px brush size, and smaller to get into smaller gaps, to fill with the creamy colour.

Then its time to add the shading and fold enhancements.
I used the same process as the eye, by selecting the colour using the 'eye-dropper tool' but darken it to make shadows and folds in the fabric. Go round all the places necessary, where the light in your drawing is not hitting it, for example under the hair, the frills and arm for mine. Then once its done to how you like it, that parts is done.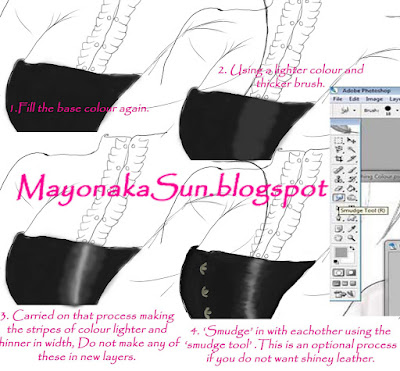
I then coloured her corset. This can apply to any leather plastic textures.
Next is the background.
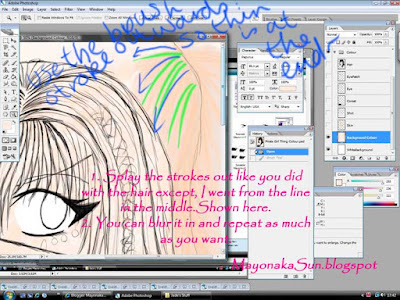 Next for the feathers. I used exactly the same technique as on the hair, except I splayed the strokes outwards from the centre line. I follow the feather direction with my tablet like again like her hair. (See image).
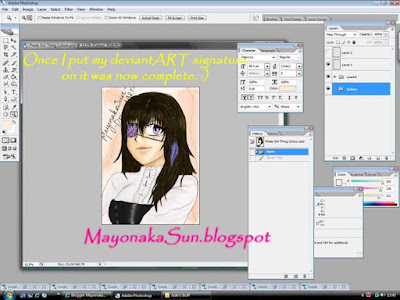
I then put my deviantART signature on and it was complete.

I then coloured her corset. This can apply to any leather plastic textures.
So again start with your base colour.
Next, lighten that colour very slight, enough to see a change in colour and draw a strip of colour where ever you need in going with the flow of folders and creases you may have in your own.
Continue this process making the stripes of colours lighter and thinner in width, until its shows similar to my example, you don’t need to follow this completely as you need to apply it to your own. As you can see its already resembling the leathery plastic look, but to enhance the look, using the 'smudge tool' which can be found by 'right-clicking' the 'blur tool' and selecting it.
Run your brush/ tablet horizontally across the shine parts to achieve a more leathery feel. (as shown in the example).
Right so, so far you would have completed your anime character.
Next is the background.
This can all be taken as an optional process as you can mix up what you do.
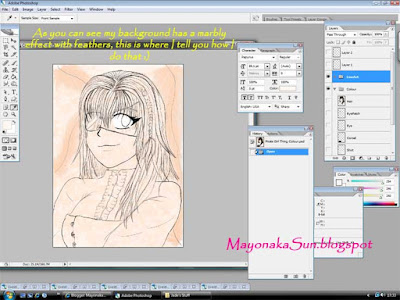
So this is my background.
First I created a new layer (shift+ctrl+N), and filled it with my base colour.
I then darkened the colour and changed my brush style, by clicking on the small arrow next to brush size selector, once that appears, I click on the arrow on the very side. This gives me a selection of different style I can choose from. I chose 'special effect brushes'. This gave me another section to choose from. I chose 'scattered wild flowers'. 
I then made my brush size huge, roughly 360px to 400px so the shapes are not obviously flowers and gives a slight marbles effect. I went all over my background and it made this look.
You can experiment on what look you want.
Next for the feathers. I used exactly the same technique as on the hair, except I splayed the strokes outwards from the centre line. I follow the feather direction with my tablet like again like her hair. (See image).
I then put my deviantART signature on and it was complete.
I hope this helped in drawing your own anime digital art!
As I said I used a tablet to making this, so if you are using a mouse, things with definitely have a different technique in making it.
As I said I used a tablet to making this, so if you are using a mouse, things with definitely have a different technique in making it.
Thank you for reading my tutorial :).
Please leave comments or a link to you own anime digial art.
Please leave comments or a link to you own anime digial art.
No comments:
Post a Comment
Please, share your thoughts~