The program I used to make this was only Photoshop CS2. Tools I used was a Wacom Bamboo fun tablet and pen.
*The techniques I show here are what I find best, you can try and find your own way, by using these techniques.
*I am using a tablet so, things will be different for people that do not have one!
*Please click on the images to enlarge, for more explaination!
*I would say this style is a combination of realism and anime.
So lets begin this digital anime art tutorial!
1.Right, so I started with all the basic lines and guide lines to start off my drawing. Where I dont think photoshop CS2 is fully compatible with my tablet, I use 'calligraphy brushes' to draw as 'basic brushes' come out 'dotty'. (Click on image to englarge for more details, if you also have this problem!)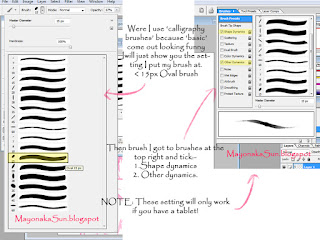
2. Brush settings I always use are as follows:-
15px oval calligraphy brush
With 'Shape dynamics' and 'other dynamic' ticked. This will make your brush as shown in the example. (Click on image for more details)
3. The third step I used to make my digital anime drawing, was drawing in his eyes, nose and mouth. As you can see his eyes are completely the same and I will show you how to do that in te next few steps!
3-2. So first thing I done to get his eyes the same was 'box' it with the 'Rectangle Marquee tool'(see image!)
3-3. Once it was all selected in the rectangle, I pressed 'Alt gr' (or Alt on a MAC) and dragged it across to make a replica on the other side. But oh as you can see, his eye in the wrong way! So what I did was right click the stil selected eye and went to 'Free transform'.
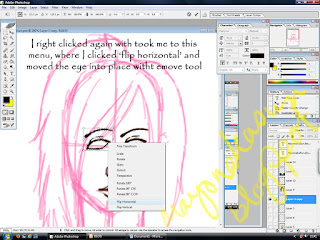
3-4. Once 'Free transform' was up and you see the 'squred rectangle' around the selected eye, I right clicked again which will bring up another drop down menu. With this I selected 'flip horizontal'. Once it once it was I 'deselected' it by either clicking on the grey space around the screen or just right clicking and selecting 'deselect'.
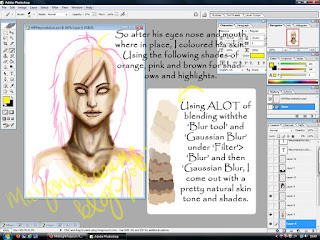
4. Then it was time to colour his skin! This I would say was the easiest parts of the colouring stages in any digital anime art! This was done easily with a range of beiges, oranges, pinks, browns and blacks ( see image!). All I do is shade in all the places I know will have shadow, take reference from your own skin or photos to get this right!
5. Next was colouring his eyes. Or Irises I should really say. So as an eye Iris is never pure white I added shades of yellows and grey around the egdes and corners to create a more natural look. (see image to see clearer what I am talking about!)
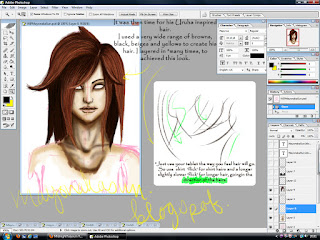 6. The next stage in creating my digital anime art was his Uruha from GazettE inspired hair. This is always the thing that takes the very most time. I would say the majority of the time spend on digital art, is on the hair (unless their completely bold then that a differnet thing all together haha). So use the brush as a pen and flick it in short strokes for shirt hairs, and long slightly slower strokes for longer strands. You will get used to this the more practice you have. The hair I made it very very layered with mutiple shades or browns, black and yellows. The more layering you make of colour strands the more 'natural' your characters hair will look. But if on the other hair you want a more proper anime hair, then lessen it to very very few strands or even block colours.
7. So then it was my hardest and weakest part to draw. His clothes..... As I am not very good at it, all I done was cross hatched and highlighted it. Though I have watched and seen numouraous clothing tutorials, I still can not pick up how to make it in a digital art form. So please if you know any great/ helpful tips on how to create clothes, please link or comment it, in the comment section below! I would really appreciate your help!
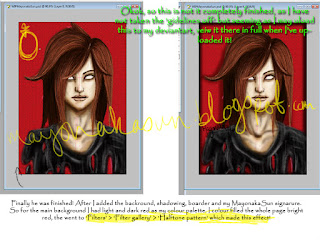 8. So this is the finall steps I took to completeing my digital anime art. All of this is completely opintional to you, so skip this if you do not want a back gorund for your anime piece!
So with the background, I put my two colours in the palette as dark red and light red this will allow me to add the effects that will look right.
Left picture:- Filled the background 'Bright Red'> 'Filters'> 'Filter gallery'> 'Half tone pattern' and that will give your effects (visit here for more examples from 'filter gallery').
Right Picture: Added shadowing, boarder and my MayonakaSun signature!
So now you've seen the process I went though to making my digital anime art piece 'Falling Apart'
I really hope it helped and please comment saying any suggestions, tips or even a link to your anime art piece.
Thanks for reading!
For artists that are stuck in an artists block please visit my new blog MayonakaSun's Art inspiration!
Please note, all of these rules apply to the contents of my entire blog, please read carefully!
All of my drawings/paintings/ digital/ art pieces belong to me (MayonakaSun) and have been made by me alone unless otherwise stated in my posts.
All text/writing/reviews are written by me (MayonakaSun) and written by myself (MayonakaSun) alone again unless otherwise stated in my posts.
You Do Not have permission to copy, repost, reproduce, print, paste or sell ANY of my art work and/or text/ writing that I have posted though out my blog and/or on my deviantART page.
The only places I will ever post any of my art work and text is DeviantART and my blog, so if my art work and/or text shows up anywhere else on the Internet or elsewhere you do not have the right to have put it there and I will not have give permission for it to be there, and I will insist you take it down immediately!
Update:My artwork will now also be seen on my tumblr as well as the sites mentioned above. Same rules apply to my tumblr as the rest.
Update2:My artwork will now also be featured in my Youtube videos as well as the sites mentioned above. Same rules apply to my Youtube account as the rest.
My/Me/ I /myself= MayonakaSun :- The owner of this blog and other sites mentioned above.
Update2:My artwork will now also be featured in my Youtube videos as well as the sites mentioned above. Same rules apply to my Youtube account as the rest.
My/Me/ I /myself= MayonakaSun :- The owner of this blog and other sites mentioned above.
You= yourself reading/person(s) reading/viewing.
Art work/Art pieces = Digital art, traditional art, tutorials, drawings, paintings and crafts all made by me.
Text/writing= Reviews, tutorial explanation(s), art work write up/explanation(s).


This is a wonderful tutoril that explains the main steps of drawing an anime character! It's very well done, I would like to add one link that could help explore even further about the hair shading: http://www.fleesveon.com/2017/11/tutorial-digital-art-process-shading.html
ReplyDeleteI hope it's of help!!
Hahaha, thanks!
DeleteThis is a very old piece now but thanks for the link :)