But still maybe it’ll help some of you too, so I thought I’d post it here.
For my examples or models I should say I will be using a picture of the Tidus from Final Fantasy X and Kyo from Dir en grey ‘cause their cool ‘n all :)
Right so for some effects I sometimes like to use first:
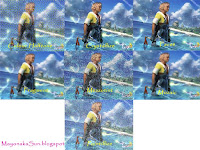
‘The Pixelate Function’
 Look for the ‘Filter section’ in the ‘tool’ menu at the top of your screen. There are lots of options within the ‘Filter’ category, and you can play with images with the pixelate function. The ‘pixelate function’ allows you to modify images and turn them into different artistic styles. This has features such as ‘Mosaic’ which makes it a tiled effect, ‘Colour Halftone’ which creates a dotted effect similar to an old comic, crystallize similar to ‘Mosaic’ just more jagged shaped tiles, ‘Fragment’ which makes it look like it got speed lines or has vibration running though it and the rest like ‘mezzotint’ ‘facet’ ‘pointillize’ all give their own effects in which you’ll find out for yourself when you have a go :).
How to Get Rid of Blemishes.
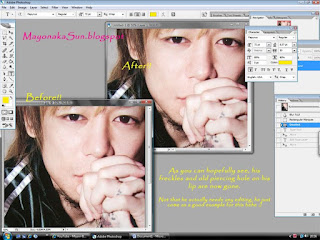
If you want to get rid of blemishes from acne, scars, and so on, you can do that in various ways. Which are very easy.
The easiest and basic strategy I’d say is, you could use the ‘blur tool’. Though this is a sometimes sloppy way of doing it, its easiest.
Select the ‘blur tool’. Go to the area that you want to fade away and then start clicking. Keep clicking blur or pressing Ctrl F until the area’s properly invisible. If the area’s too big, blurring the area would be definitely noticeable. But if they’re as small as dots on your face, rest assured that you could later on enjoy a blemish-free face from here on forward in all your images.
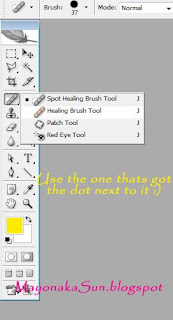
The other way is to use the ‘Healing brush tool’ and click on the blemishes, and they will disappear completely, just so long as you’ve selected ‘Spot healing brush tool’ not ‘healing brush tool’. If ‘Healing brush tool’ is selected then right click the tool and select ‘Spot healing brush tool’.


The Magic Wand Tool
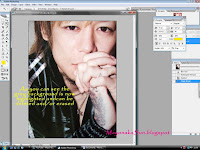
For this last example I will use my lovely model Kyo again. Now, I want to get only Kyo and nothing else. All you have to do is click the outline/ background of you’re your subject with the magic wand and voila! All done, then you can delete the background. If it can’t be done in one click, you could just add everything to a selection until you complete your subject’s image.

So yeah, I hope this will come in to some help to some of you. All you really need to do now is Practice and Practice some more and experiment with other effects and aspects of Photoshop. 'Til next post, which hopefully will be another tutorial/explaination of things.
I will try and get my other tutorials done sometime too!! D:

No comments:
Post a Comment
Please, share your thoughts~