

*Im only using Photoshop Cs2, so icon and selection maybe different on other versions of Photoshop. The same basic properties are the same though.
*The exact same things can be done on 'Image Ready', but again there maybe slight differences.
Using only screen shots or your own images. Im just using Photoshop as it comes as more of a convience to me.
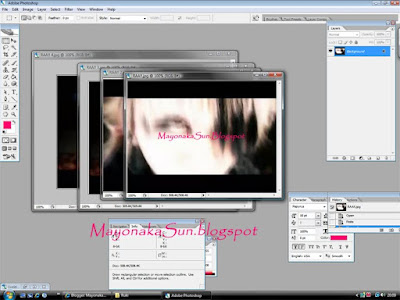
So first open all your images.
They will all appear in the boxes.
 I normally use images from videos I watch on Youtube.
*The images that I am using in the GIF examples are from 'the GazettE' music video 'Anata No Tame No Kono Inochi'.
I take mutiple screen shots of the video, at different points and crop them using any program you find easiest. To make things easier for yourself later on. Whilst saving your images, name them by number from 1, 2, 3, 4, and so on for each screen shot you take.
The I create a new page the same size as my images.
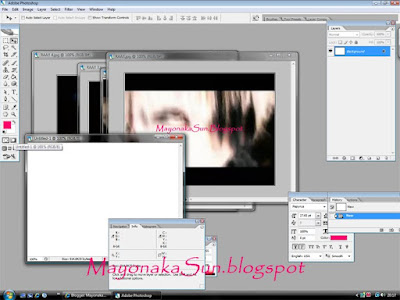
Once the new page is created I start dragging my images onto the blank one using the 'Move Tool'. Make sure you put the begining screen shot on FIRST or your animation will play backwards. If you followed earlier instrustions of numbering your images, start with 1 and drag them on accordingly.
Once you've dragged all of your images onto the blank page, you can being the animation process.You can now either switch you program to 'Image Ready' or stick with 'Photoshop'.
Right to start animating using Photoshop, get the 'Animation time line' up. You do that by going to 'Window' and the top of the screen, then clicking 'Animation' until you see its ticked.
Right so now its time for animating it.
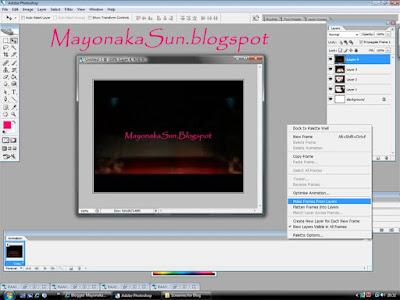
Click on the small arrow on the far right of the 'Animation time line'. The arrow may vary for whichever Photoshop you have, but the icon in place of the arrow, will still be in the same place.
Then go to 'make frames from layers.
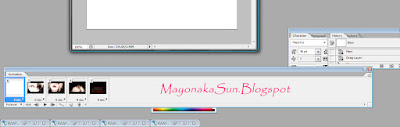
Your time line will now look something similar to this.
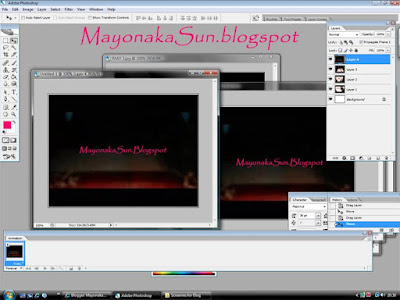
You then need to delete the the blank white box, by selecting it on the time line, and clicking the bin. Then your page should look similar to this. The first image you dragged onto the blank should be showing. If it is the last image, then go back to the dragging stage and redo it.
Then your GIF should almost be done.
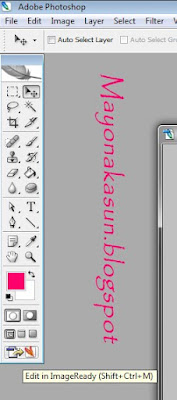
Right this is the stage where you will need to transfer onto 'Image ready' or stay on it, if you are already using it.
If you are using Photoshop, you can easily click on the icon (see image) and you'll go straight to Image Ready.
 Right so with this stage you have completed your GIF, but at this stage its going way too fast (if not then leave this stage out). I normally use 0.1 to 0.2 seconds.
You do this, by clicking on the drop down window on your layer/frame that normally starts out with 'No Delay'. You'll get a selection of time delays. Mess around with what speed you want.

Once that is done you are ready to resize and size.
So with resizing most avatars, images and so now require the pixels to be 50px to 60px depending on what website you are using.
Your change the size by going to 'Image' at the top of your screen.
Then selecting 'image size'.
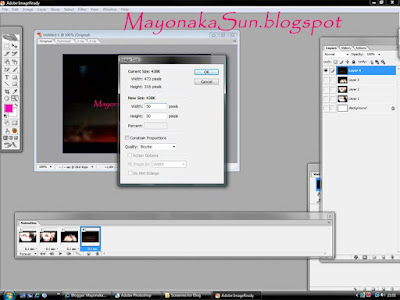
I changed mine to 60px by 60px, but you change to whatever you feel is right. The click Ok.
This will make it tiny, most websites require that type of size.
Now its time for saving.
Just click on the 'Fire Fox' icon on the side. This will transfer you to your web broswer where you can save your image. Or copy and paste the code to any website you want.


Then you animated GIF is complete.
I hope this helped.
Thank you for reading. :)
No comments:
Post a Comment
Please, share your thoughts~